You’re craving freedom, nature, and starry nights without having to invest in a camper van? A roof tent might be the perfect solution for you. More and more travelers are turning to this nomadic camping style, which is practical, quick to set up, and super comfortable. At Decathlon, the MH500 roof tent has won over adventurers thanks to its excellent value for money and ease of use. But one question keeps coming up: how do you install it properly on your car?
In this guide, I’m sharing my personal experience with the MH500 roof tent, step by step, to help you install it easily, stress-free, and most importantly, safely. Let’s get started on the adventure!
Which car is compatible with an MH500 roof tent?
Before diving headfirst into installing your MH500 roof tent, you first need to make sure your car can accommodate it. The good news is that most vehicles are compatible, as long as you meet a few essential requirements.
First, check the dynamic load capacity of your roof (usually indicated in the manufacturer’s manual). It must be higher than the weight of the tent, which is around 52 kg for the MH500, not including accessories and bars.
Next, your vehicle must be equipped with sturdy crossbars, capable of supporting the total load. These bars can be original equipment or purchased separately, but they must always be securely attached to solid anchor points (integrated rails or specific mounting points). Avoid suction-cup or magnetic roof bars—they’re clearly not suitable for this type of equipment.
In summary: SUVs, station wagons, some 4x4s, or minivans are ideal. For compact city cars, you need to check the limitations carefully, but some models work perfectly well with the MH500 roof tent.
Equipment needed for installation
Installing an MH500 roof tent isn’t complicated, but you do need a bit of equipment to make sure everything goes smoothly (and avoid getting frustrated from the start!).
Here’s what you’ll need:
The MH500 roof tent obviously, which comes with its mounting kit.
Sturdy crossbars, suited to your vehicle. Make sure they’re compatible with the tent (maximum load, spacing, etc.).
A stepladder or stable chair: the tent mounts on the roof, so a little height boost is always helpful.
A wrench or ratchet wrench, depending on the mounting system used (often included with the tent).
A tarp or blanket, if you want to protect the bodywork during installation.
Quick tip: set everything up in the shade, especially if you’re in La Réunion or in the middle of summer, because lifting the tent in full sun gets hot fast! And if it’s your first installation, do it with two people: it’s safer and honestly much easier.

Steps to install the MH500 tent on your car
You don’t need to be a handyman or mechanic to install the MH500 roof tent, but following a logical order will save you a lot of hassle. Here are the steps I recommend after several installations:
1. Prepare the work area
Choose a flat, clear spot, ideally shaded. Lay a blanket on the roof to avoid scratching the bodywork during handling.
2. Attach the rails under the tent
Turn the MH500 upside down on the ground (gently, of course!) and attach the aluminum rails with the screws provided. These rails are used to secure the tent to the roof bars.
3. Position the tent on the roof
This is the step where it’s better to have two people. Lift the tent onto the crossbars and center it properly. Make sure the ladder will be oriented on the desired side (left or right).
4. Tighten the mounting clamps
Use the U-clamps and nuts provided to securely attach the tent to the roof bars. Tighten gradually while checking that everything is properly aligned. Don’t hesitate to do another check at the end.
5. Test the opening
Before hitting the road, open the tent fully for the first time to check that the ladder is properly adjusted, nothing is sticking, and everything is stable. This is also a good time to install the mattress and pillows.
And there you go, your MH500 roof tent is ready for the road! 🎒

Our practical tips for a stress-free installation
Even though installing the MH500 roof tent is relatively simple, there are always a few little tricks that can save you time (and keep you from getting frustrated!).
🌤️ Install it with two people
This is probably the most important tip: even though the tent isn’t super heavy (around 52 kg), it’s bulky. With two people, everything becomes smoother, faster… and less risky for your roof or your back.
🧼 Protect your bodywork
A simple folded towel or blanket is enough to protect your roof from friction during installation. It’s a simple reflex but very useful if you care about your paint.
🧰 Do a practice run
Before your first road trip, set up and take down the tent once at home. Open it, close it, adjust the ladder… You’ll be much more relaxed on the day. Trust me, learning to manage the opening in the middle of nature, in the rain and half-tired, isn’t ideal.
⛽ Don’t overlook the impact on driving
Once mounted, the MH500 slightly changes your car’s aerodynamics. Expect a slight increase in fuel consumption and especially, adjust your speed on the highway (110 km/h maximum recommended).
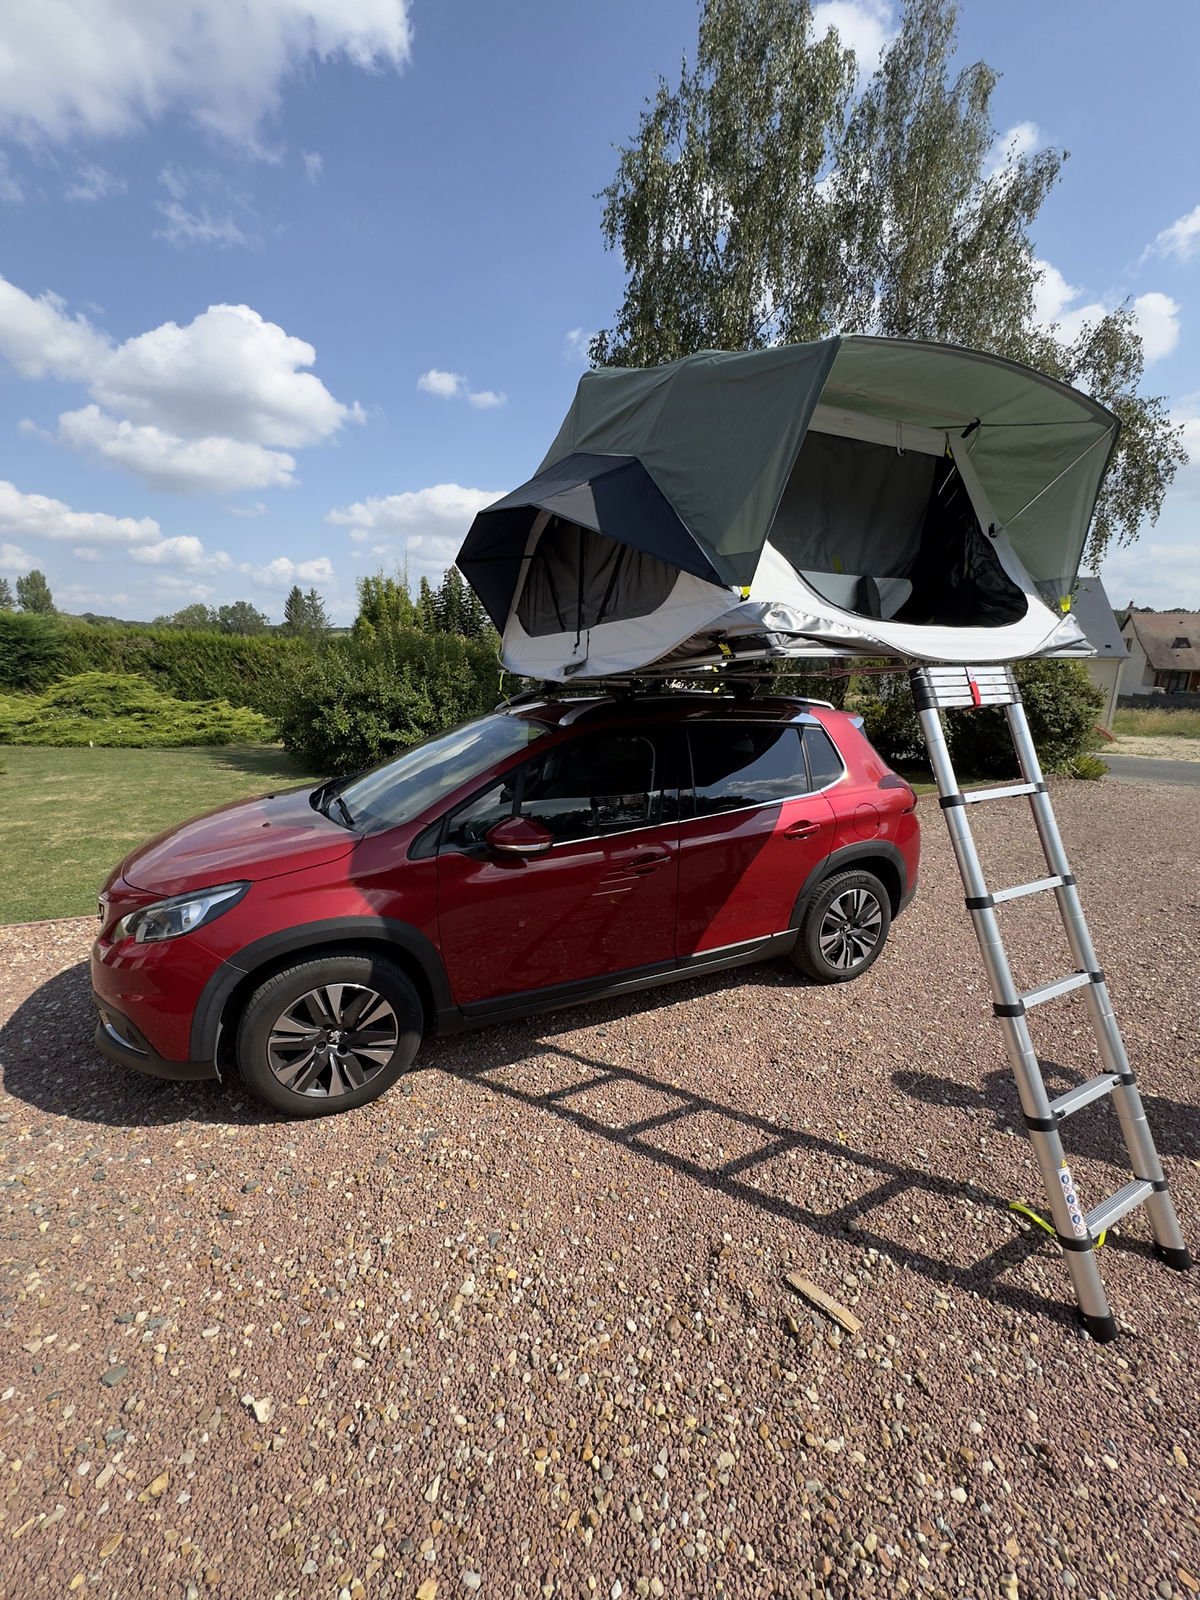
Should you take it down after each trip?
This is a question many people ask after installing their MH500 roof tent: do you really need to remove it after every weekend or road trip?
💤 What I personally do
Honestly, if I’m doing back-to-back trips, I leave it on the roof. It avoids redoing everything each week and lets me be ready to go in a flash. But if I know I won’t be using it for several weeks, I prefer to take it down and store it under cover.
🏁 Advantages of leaving it mounted
Saves time before each departure
Less handling, so less wear on the mounting hardware
Convenient for regular travelers or long road trips
⚠️ Drawbacks to be aware of
Slight increase in fuel consumption (around 0.5 to 1L/100 km more)
Wind noise at high speed
Permanent weight on the roof: not ideal for short daily trips
Risk of deterioration if left exposed to sun/rain for a long time
In summary: if you use your MH500 roof tent frequently, you can keep it installed without worry. Otherwise, a quick removal and dry storage will extend its lifespan.
Useful accessories for installation and comfort
The MH500 roof tent is already well designed, but a few accessories can really improve the experience—both for installation and for spending comfortable nights in the great outdoors.
🧩 Anti-condensation mattress pad
Essential if you’re going away for several days, especially in humid climates. It improves ventilation under the mattress and prevents moisture from building up. Decathlon offers a model that fits perfectly with the MH500.
🪜 Longer telescopic ladder
If your car is tall or you want more comfort climbing up, a better-quality telescopic ladder can make all the difference.
🛠️ Leveling blocks
Super useful if you’re sleeping on sloped ground. With simple blocks to slide under your wheels, you can get a nice flat bed and avoid spending the night with your head lower than your feet (that’s a recipe for a headache…).
🏕️ Awning or side tarp
To protect yourself from rain or sun at the tent entrance. Some models attach directly to the MH500 roof tent, perfect for cooking or changing under cover.
💡 Small LED string lights or hanging lamp
To light the interior in the evening. Go for a rechargeable version with soft lighting, to keep a cozy atmosphere without attracting every mosquito in the area.
My take after several installations
After several road trips with the MH500 roof tent, I’ve had time to mount it, take it down, remount it… sometimes in the rain, sometimes by headlamp. And honestly, my feedback is very positive.
⏱️ Reasonable installation time
The first time, you take your time, you have some doubts, you check three times… and that’s normal. But by the second or third installation, it becomes really smooth. With two people, we can mount it in 15 to 20 minutes max. Alone, it’s doable but a bit more challenging.
🧩 Things I’ve improved over time
I added a mattress pad for comfort and insulation
I now mark my ladder settings with a marker to go faster
I invested in leveling blocks and a hanging lamp to improve quality of life
💬 What I appreciate most
The space saved inside the vehicle
The view when waking up at height
The sense of security for sleeping anywhere
In summary, the MH500 roof tent delivers on its promises: it’s sturdy, easy to use, and perfectly suited for road trips on the island or on the mainland. It’s a great compromise between the freedom of camping and the comfort of a proper bed.
Where to buy the MH500 tent?
If the MH500 roof tent catches your eye, know that it’s available exclusively at Decathlon. You can buy it:
Online via the official Decathlon website, often with free delivery to your home or a pickup point.
In-store, at certain well-stocked locations (call ahead to check availability).
Or via click & collect: you buy online, you pick up in-store.
I recommend checking availability regularly, because this tent sells out fast, especially as vacation time approaches. If you’re still hesitating, keep in mind that it’s covered by Decathlon’s return policy—a good point for testing it out with peace of mind.
👉 Here’s the direct link to check the price or order your MH500 roof tent.
Conclusion
Installing an MH500 roof tent on your car isn’t that complicated, and most importantly… it’s the start of a great adventure! Whether it’s for a road trip in La Réunion, a nature weekend, or even a journey across Europe, this type of equipment offers unmatched freedom.
With a bit of organization, some good habits, and the right accessories, you’ll be ready to sleep comfortably anywhere, up high, under the stars. And honestly, once you try it, it’s hard to go back to a regular tent.
If you have questions or want to share your experience, the comments are there for that. And if this article helped you, feel free to share it with those who dream of sleeping in nature without complicating their lives!
FAQ – Installing an MH500 roof tent
Can I install an MH500 roof tent on any car?
No. Your car must be able to support at least 75 kg on the roof and be equipped with suitable roof bars. Check the manufacturer’s manual to find out the maximum allowable load.
How long does it take to install the MH500?
The first time, allow around 30 minutes. After that, with a bit of practice, you can mount it with two people in under 20 minutes.
Can you drive with the roof tent installed?
Yes, the MH500 roof tent is designed to stay on the roof during travel. However, it’s recommended not to exceed 110 km/h.
Does it use more fuel?
Slightly, yes. The tent changes the vehicle’s aerodynamics, which can lead to an increase in fuel consumption of 0.5 to 1L/100 km depending on the car model.
Should you take it down after each trip?
Not necessarily. If you go out often, you can leave it on the roof. However, if you’re not using it for several weeks, it’s better to take it down and store it under cover.
Book an activity in Réunion
Compare the best tours, boat trips, guided hikes, and activities in Réunion before booking.
This post is also available in:
 Français (French)